Sunday, 10 November 2013

KS Ultralight Gear waistpocket


KS ultralight gear waistpack full of big Chestnuts
My two decades as a dedicated runner went by nearly as fast as you can blink your eye with. From early days as an evening road runner, to shave some kilograms from my overly obese body, I developed into running "junkie" and moved my ways from road to trails. As mileage and altitude increased so did my needs to carry extra food, water and clothing. I went through many diferent pack arrangements in which I carried all the extra goodies, from simple waistpack as PeteBlands bumbag to more volumenous backpack such as made by Golite and all in between. They all had their pros and cons but the biggest issue for me was that bumbags had to be chinced down too much and started jumping about when half full, also they rub and fell apart very easy. The biggest plus while running with a daypack was volume that alow to take lots of extra clothing, food and water and proved to be stable on my back no matter if full or half way loaded. But I had issues with it being too sweaty at my back or too big if taking only minimum of extra clothing, food and water. I sweat like a pig while working hard so sweaty back wasn't that great in cold day runs or winter. I truly missed versatility to add or remove the volume according to my needs.  

With a bit of research I found one man cottage factory in Japan KS Ultralight gear owned  and run by Mr. Laurent Barikosky. His waist pocket looked exactly what I was looking for and after few emails he sent* me one to test it out.


KS Ultralight gear waist pocket in full configuration at water source
Before I go to more specific techical details about the waistpack I would like to share that workmaship is immaculate as you would expect from cottage makers in Japan. My friend Mr. Jotaro at Locusgear has shown me his superb work last year and I got firsthand impression that "guys" in Japan know what the gear making business is all about. The work from Mr. Laurent is no different. Superb with all honesty. There's no single missing stitch, any loose thread or anything that could make you say: "that guy was in a hurry putting this up". Zero..no complaints at all. The design is also very meticulous, not just some usual waistpack and you can tell that there was tinkering behind. Not just copy this copy that.  Also communication with Mr. Laurent went smooth. He was very responsive on my questions and e-mailed all the information I asked from him. 


Wearing the waistpack. Side view, and fatty belly:)

Here are my observations:

main material is Dyneema nylon fabric which ensures extra strenght of the waistpack and longetivity of the product. Overall weight of waistpack with two extra side pockets is 190g. All zippers are YKK brand and made in water resistant version. Money well invested I will say,
- waistpack consist of 25mm waistbelt to which one 5L main compartment and two mesh side pockets are permanently attached,
- there is a simple pull drawcord at the top of the main compartment to adjust its volume or to hold lightweight items like windshirt (on the picture above you can see it holding my windshirt). Nice long zipper on the main compartment opens up both ways (two pull tabs) and give you option to take out what you need on the go. The zipper operates smoothly and two pull tabs open it up both ways independently,  
- mesh side pocket perfectly holds one 0,5L water bottle. There are two so you can take lots of water on the long stretch. Bottles are secured with a lenght of elastic drawcord which works great and adds extra security on the bumpy ride. I've also put beanie and gloves into one of them if taking only basic waistpack configuration. Extra elastic draw cord helps you to close off the mesh pocket so you don't loose your items. There's minimal stertch in mesh. Once loaded with heavy water bottle it holds its shape very well.

Basic configuration. Main compartment with mesh bottle holder, drawcord.
- 3D mesh at the main compartment back side and most of the waistbelt (note the fin shaped design below) offers super comfy padding so that the waistpack sits comfortably on small of your back and it doesn't bounce or rubb your waist. Think nice padded backpack waist harness and smooth comfy ride.


Back side. Note comfy mesh padding and long fin shaped waistbelt.

- to all this you have the option to add or remove single 1L side pocket if more or less volume is needed. Two side pockets are available and are huge bonus when you plan to take more. They are box shaped and thus hold a lot. Nice smooth running zipper opens up easily to give you access to the pockets volume (the zipper pull tab below was replaced with glow in the dark version so I can see it in dark) and internal glove hook is handy to secure your car keys.  


Extra waist pocket. 
Note boxy shape, two vertical attachment straps and two hooks
There are two ways you can rig the pockets up. One is to use two vertical straps and slide the pocket on to the waist belt and the other is to slide the waistbelt through the vertical straps and use two pack hooks to attach pocket to its dedicated loop. Loop is made of cord and permanently attached to the waistbelt. This way is super safe and pockets don't bounce.   

Two cord loops. Anchoring points for extra side pocket.
Showing attachment loops and vertical straps that hold side pocket.

What I find unique and very meticulous in extra pocket desing beside its boxy shape is that the attachment pack hooks are not placed at the same level like on most extra belt pockets but are placed in such a way that once pocket is attached to the waistbelt it doesn't curve with your waist curve but holds its boxy shape very well thus not reducing its volume or giving hard time to unzip and access. Once you wear the waistpack you can see how well this works.  


Wearing waistpack. Note how well the extra pocket holds it boxy shape!
Since I got the waistpack I've done several runs and day hikes and I can say it works wonderful. The volume adjustment you get with extra side pockets means you can configure it to suit your needs and that's a big bonus to me. It wears nice be it loaded with heavy stuff like full of Chestnuts I picked up while doing a run or loaded very lightly. It just sits there. Quiet on your waist so you don't realy note wearing it until you need to reach for something extra be it main compartment or extra side pockets. Water bottle is easy to reach while working hard for ever needed sip and is also easy to be put back without stopping. Main compartment drawcord works wonders when your main compartment volume needs to be downsized. Simply pull the elastic cord and it pulls compartments insides closer to your body which means closer to the center of gravity so it stabilize the waistpack even more. As mentioned above, drawcord helps to attach things on the outside of main pack which is handy and works great.

Waistbelt buckle is easy to adjust and it holds very well. If you have small day pack and need to add a bit more volume to it you can easily use extra side pockets on your pack waist belt as well. I'll add anchoring points on my Golite Ion to attach waist pockets secure and easy.
Extra side pocket on day pack to add more volume!
I am very satisfied whit what this little waistpack offers. Very versatile, volume adjustable and sturdy. Just what I was looking for. As with most things there are some points of possible improvement: main comparment zipper pulls can get noisy banging agaist each other so exchanging them with something more silent like piece of dyneema cord would be welcome. Also I have rather large hands and find tiny zipper pull tabs that the waistpack came with simply to tiny and thus hard to handle especially while wearing thicker gloves. I'll probably exchange that with a bit bigger zipper pull tab as seen above. What I would also like to see on the main compartment is outside mesh pocket big enough to hold pair of gloves etc. if you aint rocking two extra side pockets and your main compartment is bursting full. Or add glove hook to my gloves and hang them to the extra side pockets ancoring points. Maybe Mr. Laurent can shave more weight without compromising waistpacks sturdiness by choosing lighter nylon dyneema fabric. 

With winter pushing in I am happy to own this little gem as my needs for more volume will be getting bigger. Also I started XC skiing last year so additional volume in the waistpack will be handy while plodding about in full out winter. 

If you are looking for your next waistpack or would like to add extra volume to your current pack I would suggest you look at Mr. Laurents work. He offers lot of customization on the gear he makes and beside waistpack he designs, tests and makes lots of high quality backpacking gear. Check him out. A true cottage manufacturer. All thumbs up!  


*I pay for the shipping cost of the waistpack. Thank you Mr. Laurent for your generosity and helping me out with your waistpack. 


Saturday, 12 October 2013

Trash full of Gold


It's been a while since my last post on the blog. Being a young parent and full time worker leads to shortage of time one can spend just for himself. Anway in the past few months I spent few minutes of my real "free" time daily tinkering of how to build simple&free water boiling kit. 

I set myself with few goals:

- FREE and 100% made from used materials = trash only or project upcycle,
- enough for my summer or day hiking needs = FBC & one cup tea,
- compact = all MUST fit inside the boiling pot,
- simple&no frills to use,
- efficient&cheap to run = alcohol type fuel, 
- and as light as possible = sub 50g.

Why trash? People are using waste materials for decades. So all this recycle or upcycle hype ain't that new after all. Right? As a kid I remember watching "gypsies" collecting all sorts of waste from our local scrap heap. They must be mad I said but actually they were smart turning trash to gold! So why not seek and find all the components from the bin?

One cup only? I think in heat of the summer when we need more refreshing cold water&drink, boiling kit that boils one cup (250ml) suffices easily for FBC style food or for
few sips of fresh tea brew in the morning to get the body going.  

Compact? All must fit inside the boiling pot and stay in there. That way I know exactly where all the "cooking" related items are. Inside the boiling pot!

Simple&no frills? Easy does it. Easy to make, easy to use!     

Efficient & cheap to run? Wood is free I know but rather slow and it takes time to prep before use. I think denaturated alcohol is always available and cheap enough even for the biggest cheapskate. From one liter (~5 EUR/liter) you get ~ 100x one cup boils. 

Light as possible? Following threads at BPL discussing SUL, XUL (or whatever _UL) cooking kits made me set the limit. I know you can buy kits as light like that, so the challange to build one was even greater. Beside it's always good to set a challange, work on it and once it's done try to improve it. 

So after I did thorough research on used materials I can easily pick up at various sources (yes even trash bin) I made the following sub 50g kit.


Weight&materials brake down is:

- Pot ~ 16.5g = empty aluminium tuna salad can,
- pot lid ~ 2g = aluminium, cut from used beer can + lenght of dyeema cord,
- wire bail ~ 1g = stainless steel, made from welding wire (TIG, MIG technique I am not sure about that), strong enough to safe&easy remove the pot off stove,
- pot stand ~ 6,5g = tripod, stainless steel welding wire left overs, 
- stove ~ 6g = used deodorant aluminium bottle (I have made few from aluminium bottle caps sourced on empty olive oil bottle) cut to volume, I added stonewool found at local construction site to hold the alcohol and covered it with tinny stainless steel mesh cut from used splatter screen,
- heat reflecting disc ~ 0,5g (actually my scale doesn't record it, but it must weigh something) = aluminium, cut from used beer can,
- windscreen ~ 7,5g = aluminium, cut from used beer can, single holepunch used to add a line of wenting holes,
- "cook kit" lid ~ 8g = to cover all up into nice and compact storage, PE lid sourced from empty cheese container.

I need to add tinny alcohol container to the above. 

The silicone wrist band above was later replaced with more finger friendly wire bail!

 Compact? 


I used it on several occasions since I've made it and it's great. Nice&compact + light enough for me. I see no reason not to take it even on a short hike. You never know when you fancy a nice warm cup of tea or soup. The alcohol stove can be replaced with DIY version of Brian Green Esbit stove to cut some more weight, but the pot stand should be made a bit higher. 


It's so easy to make one so I encourage you to look around as there's plenty usefull trash lying around. Trash full of Gold!

Saturday, 12 January 2013

Alpina BC 2250 vs.Traverse nordic Backcountry ski boots

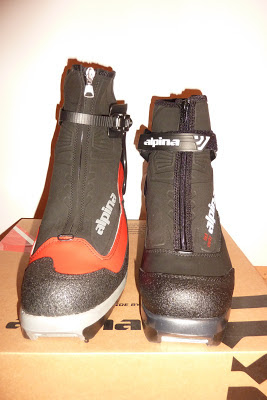
                    Alpina BC 2250 boot on left and Alpina BC Traverse boot on right hand side.

Few weeks ago I had a chance to buy a pair of Alpina nordic ski Backcountry boots with a little help from Mr. Joe.We've been in contact about Alpina boots for few years now and I've promissed to reach him when there'll be a chance to get, otherwise not that cheap boots, for a reasonable price. The moment came this year when Alpina (which is close to my home) had buy one take two offer and we jumped at it. He opted for Alpina BC 2250 and I for Alpina Traverse Backcountry ski boot.

Both models are Alpina's top range Backcountry ski boots. What they have in common is that both are made to be used with Rottefella BC NNN bindings such as BC Magnum or BC Manual. Both have insulated inner bootie made from Alpina's proprietary waterproof breathable membrane Alpitex and well know Thinsulate insulation. To close the bootie you just simply tie it up with lovely red shoe laces.


                                        BC 2250 neoprene overshoe folded to show inner boot

Both models have neoprene overshoe to add extra warmth and protection from the elements, which closes with YKK zipper. Zipper on BC 2250 is much stronger and waterproof where as Traverse boot sports lighter non waterproof YKK zipper. Both models have built in gaiter ring to attach your gaiters (word of caution here, gaiter ring failed on my first outing and should be replaced with something stronger). 

                                      Front view to show neoprene overshoe closure and gaiter ring

Neoprene overshoe is much higher on BC 2250 model and feels thicker. Boots have different cuff closure system. Closure on BC 2250 is rugged plastic ring with plastic buckle which can be adjusted to get the best fit and support. Closure on Traverse is simple adjustable Velcro closure. Both neoprene height difference and cuff closure systems can be seen on the above picture. 

Another difference is plastic cuff on both models which according to Alpina "assures additional strength, better and stronger lateral support. Upper zone embraces just above the ankle and gives more comfort and better leg support". As you can see on the picture below the cuff on BC 2250 sits higher above the ankle and gives better lateral support to the boot compared to Traverse model.

                                Plastic cuff on BC 2250 model

                                Plastic cuff on BC Traverse model

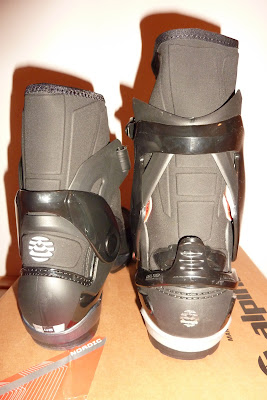
BC 2250 have different heel fit to Traverse. Once I placed my foot inside BC 2250 I didn't notice any heel lock or heel support from the back of the boot so my heels were lifting up while walking and  inside volume at the heel part of the boot was notably voluminous! They have special heel grip system which according to Alpina "enables adjustable foot retention. The top of the heel cup can be modified, which results in an optimal fit of the shoe, greater comfort and functional grip of the foot". Either my very wide feet have rather thin heel or the heel grip system just doesn't work out for me. After trying different settings (you simply pull the pull tab up to reduce heel volume, but it can only be done when you are not wearing your boot) my heels were still lifting up while walking and volume was not that much reduced. I haven't noted any forefoot width difference between the two models, but there is more volume in BC 2250 boot.

                               Back view to show heel grip system on BC 2250 model (right side picture)


Boot flex on both models is same, not too stiff not too bendy and both offer good support. I wasn't happy with BC 2250 fit so I opted for slightly lighter but still very good and functional Traverse model. I am novice nordic skier since this winter and believe they'll be just perfect for that, but so would BC 2250 if they would fit me just a bit better.

I did some nordic Backcountry skiing since I've bought the boots and can say they are realy good. Nice and warm and even good to walk in when slopes are to steep and icy. I've used microspike crampons on very icy slope and had great result with the combo. 

If you are looking to get a pair of new nordic Backcountry boots I recommend you look at the two models mentioned.

Cheers!